Sunday, December 30, 2012

A Craft a Week: The Year in Review

Last year at this time I was in Turkey with two wonderful friends visiting.  We scaled down Castle Mountain, ate cake in the rain, and hamam-ed it up.  It was a wonderful end to 2011.  

I spent the last days of the year contemplating a crafting goal, and a blog that would accompany it.  Thus "Crafts From My Couch" was born.  I am super proud to say that I was successful in my goal of completing a new craft, and blogging about it, every week. I'm less proud to say that this is the first New Year's Resolution I've ever kept. But here's to turning over new leaves. 

During the year, I improved upon skills I already had (embroidery, crochet, sewing), and embarked upon new crafting adventures (upholstery, painting, wood working). I proved that I could finish something I started, and the piles of "some days" disappeared. I learned that crafting something didn't always involve buying new supplies, and that when it did, I should only buy for right now. Also, crafting stopped being a chore, and started being a routine, a constant companion to movies, TV, and everyday life. 

I'm still not the crafter (or blogger) that I hope to be some day, but I'm closer than I ever have been.  

I figured as a way to celebrate the ending of the year, I would do a Top 12 List.  So below are my favorite projects of 2012, one month at a time. 

January:

February:

March:

April:
  
May:

June:

July:

 August:
Week 34: A Home For My Jewelry 

 September:

 October:
Our Dining Room Table 

 November:


December:
Week 49: The Tiniest Little Purse

Wow!  That was way harder than I expected.  So, because I can't leave these out, here are some honorable mentions:
Bamboo Drama
Beaded Necklace
 
Turkey Love

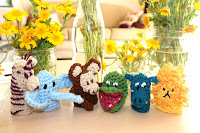
Finger Puppet Parade

Anniversary Art

Frame wall

Skulls

Honeycomb quilt

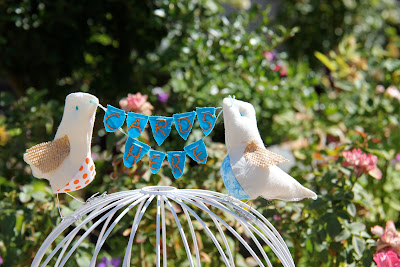
Beach Washed Christmas

Saturday, December 29, 2012

Cozy Crochet Slippers

 I'm on a slippers kick!
Also, I'm amazing with puns.
 Puff-ball ballet flats...  

And party-button Mary Janes. 

My craze was all started by this gift of SUPER CUTE and ULTRA COZY slippers from my amazingly crafty friend.  Look at those buttons!  She made those too!

GREAT birthday gift!

Unfortunately, her pattern is knit.  And I'm just not in a knitting mood these days.  So I got on Google to look up some free crochet patterns.  As usual, following the pattern gave me a seriously over-sized slipper.  History:  The first pair of slippers I ever made came out the size of bathmats. This time I was smarter, and tried them on multiple times throughout the process, reducing stitches, and deleting rows when I noticed them being gigantic.  Also, I got better at ripping out rows and starting over, rather than powering through.  That said, my 4th attempt was still WAY TOO BIG (pictured below).

Eventually, the pattern that worked for me was to do everything in HDC instead of DC, and to HDC2TOG all the way around to finish (yellow yarn).  This made an appropriately sized slipper that hugged the foot at the top.

Then I attached the puffs, because I love flair.
Too cute.
The next pair I made was similarly problematic with the sizing.  They fit somewhat snugly around the sides, but they were SUPER long.  To solve my problem this time, I deleted rows 10-13.
 Then I went to my button stash. 
 And decided a plethora was better than just one.
 Cute and cozy!

Now to find a good pattern for Alan...

Tuesday, December 25, 2012

Tuxedo Pillow Cover

One of my friends REALLY loves buying new throw pillows.  Unfortunately for her, her husband is not as huge of a fan of them.  We've discussed doing a throw pillow exchange, but really, I don't have any to trade with her. So I figured I could add a few to her collection in the form of pillow covers.  

I bought some silky iridescent fabric that reminded me of the ocean. I figured it would be a good match to their beachy Morro Bay home.  

I started by cutting 4 strips of fabric (1 yard x 4 inches). 

Then I folded then each in half length ways, and sewed a seam down the side.  After sewing each strip, I flipped them all inside out. 

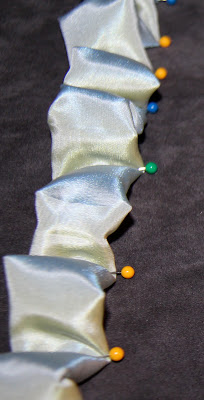
Then I gathered each strip and used a million pins to attach them some gray suede.

Four rows, evenly spaced.

After sewing each of the ruffles down, I pinned one side of a zipper to the top of the square of fabric.

I sewed one side of the zipper to the front of the pillow, and the other side to the back.

After the zipper was attached, I flipped the front and back inside out, and pinned them tightly around the pillow.

I forgot to leave the zipper open a few inches, which made it very difficult to pull the pillow out.  Don't make that mistake.

After sewing around the sides, and flipping it right side out I had a slightly loose pillow case.  We'll see how it fits her pillows before I try tightening it up.

 I started making a coordinating pillow case to go with it...
Unfortunately it's on time out for being really unattractive. 
Disclaimer:  I have different rules for children and pillow cases. 

Happy Holidays D!

Beard Beanie 2.0: Now With More Mustache

Remember the first week of this blog?  When I made beard beanies for two of my favorite guys?  Check out the pattern at Week 1: New Beards Eve.
After those first beards, I got some requests for a few more:
One for a creative friend...
 Who turned it backwards to make a "surfer dude beanie,"
And one for a friend in Chicago.

For most of the year, only a handful of friends checked out the pattern, but as the weather turned cooler, this became one of my most frequently read posts, with over 1000 reads.

So this year I updated it...
Merry Mustache Christmas!
Thank you to my gorgeous siblings for modeling the "handlebar beanie" a monster beanie.

I followed this pattern for the mustache, and then added three buttons to the back of it, so it can be removed from the beard. I also used a button on each side of the beard so that the beanie can be worn by its self.  

For the monster beanie I used my top down beanie pattern, and added some teeny tiny bunting for the teeth. 

Merry Christmas Clowns.  Love you both.

Monday, December 24, 2012

Continuing the Cross Stitch Tradition

I spent a day this summer helping my mom hang up pictures and other treasure in her new home.  On a wall next to a cozy chair, we hung up a collection of cross stitch art that my grandmother had made for my mother.  Some of the pieces were made by my mom too.  So this Christmas I decided to learn to cross stitch, and add a third generation to my mom's wall. 

I started with some cross stitch fabric, some mini hoops, and my stash of embroidery floss. 
As with most other crafts, I didn't bother to actually learn how to do it, but just figured I could wing it with a bunch of x's. Can't be that difficult right?  I started by drawing the outline of some birds on the fabric.  Right away all of my coworkers told me I was doing it wrong.  I just kept going though. 

I made a pelican...

And an owl.  

But I didn't know what to do with this super messy back.  So I looked it up.

I found a tutorial on Maximum Rabbit Designs. I hadn't left enough extra fabric around the pelican one, so I was able to do the owl one according to her instructions, but I had to do the pelican one slightly differently.  

I cut two circles of tag board (one the size of the inner ring, and one the size of the outer ring). I cut some circles of batting just a bit bigger than the tag board, and some fabric just bigger than the batting.

Then I used embroidery floss to pull the fabric tight around the batting and tag board.

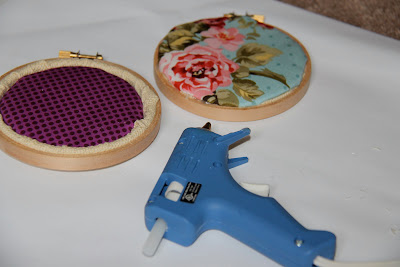
Two fabric covered circles ready to hide the ugly backs of my work. 

I tucked the front fabric down around the inner hoop, and hot glued the covered disks over the mess. On the owl I was able to follow her directions (plus hot glue) and fit the disk inside, but on the pelican I folded the fabric in as well as I could and glued it to the hoop.  I actually liked that way better, and will probably do it that way if I ever do it again.

That said, this may be the last time I ever cross stitch.  This was the most TEDIOUS craft I have ever done. What looks like it should have taken 10 minutes took a months worth of lunch breaks and cramped fingers.  All worth it for my favorite lady.
Merry Christmas Mom!