Showing posts with label Free Pattern. Show all posts

Monday, April 30, 2012

Week 16: Kindle Case

 Week 16 was a week of family visits and traveling! We met Alan's parents, sister, and brother-in-law in Istanbul, and then headed over to see Kapadokya as well. Woohoo!

 So this craft comes not from my couch, but from two planes, four bus rides, and two hotels. Also, it comes from being scrunched in a carry on bag, so I apologize for the wrinkles.  Also, it's challenging to hold a craft and a camera on my lap while on an airplane, so sorry about the lack of mid-craft pictures. 

 I also brought this little buddy along with me on the trip... and it was shouting at me about how badly it needed a case.  
I drop it plenty even when I'm not traveling, but now that I'm on the move, it's in serious danger. 
So Kindle, my trusty friend... a case for you it is! 

I chose some of my favorite unused yarn, and planned out a cover that might end up looking like a retro hard-cover-book. (The kind where the spine is a different colour than the rest of the cover).

Insert wrinkly picture. 
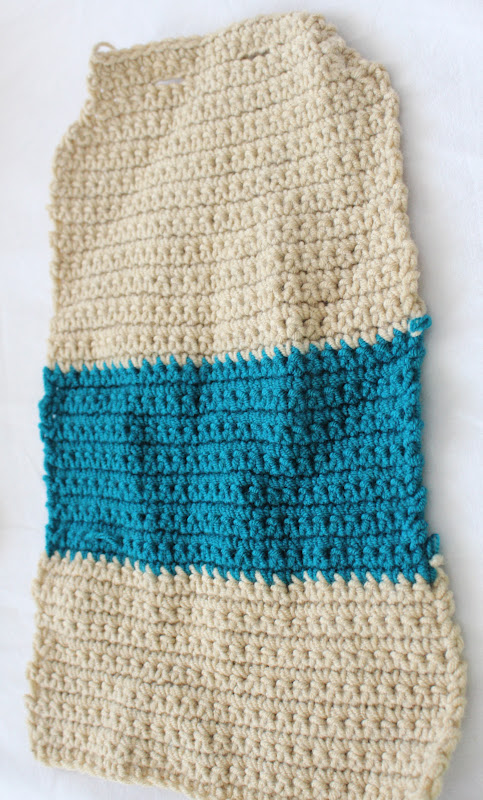
I started at the bottom of this picture.  I chained a length of yarn that (without stretching) reached from the top to the bottom of my Kindle.  Then I added about 5 extra chains. (26 total.) 
Turn and single stitch across. Do 16 rows like this. 
I attached the teal, and continued on in the same way, for 15 more rows. 
I reattached the beige, and added 16 more rows.

At this point I had a tall rectangle.  I tested it out by folding it around the Kindle to make sure that I had a little overlap on all sides.
  
When I was sure it was right, I added on the flap.  I did this with 5 decreasing rows (Ss2tog at the beginning and at the end of each row).
Sorry about the bad picture, but if you look really closely (maybe magic-eye it), you can see the edges slanting in.

Button holes.  Terrible explanation below...
Then I needed a button hole row.  Luckily crochet button holes are WAY easier than sewing machine button holes.  Decide where you want the button holes, and how big you want them (mine are really big), then chain rather than single stitching in the place of the hole.  I started with 3 single stitches, then chained 3, and skipped 3 from the row below, and single stitched back into the 7th stitch of the row below. I did 2 more single stitches, chained 3 again, skipped 3, and single stitched to the end of the row (3 more stitches).
Wow.  That sounds so confusing.  But I promise button holes are super easy.  
 Maybe this diagram will help:

XXX - - - XXX - - - XXX
XXXXXXXXXXXXXXX
X=single stitch
- = chain

After the button hole row, I added three more decreasing rows, and fastened off.

To attach the sides, I lined the edges up carefully and then whip stitched them together with matching yarn and a yarn needle.  Truthfully, I didn't love how this looked, so I tried again using a crochet hook, and single stitching the sides together.  I think it made a cleaner edge.

Whip stitched together:

Single stitched together:

Once the sides were attached, I Slip Stitched around the opening to clean up the rough edges.

Also I crocheted a little "T" for Tana, because my mom's Kindle needs a snuggly case too.
For the "T," I Chained 7, turned, and single crocheted across for 2 rows. On the 3rd row, I Slip stitched the first 2 stitches, and single chained the next two, then turned.  I added 4 rows of single chaining only in those middle 2 stitches. Then I slip stitched all the way around to clean up the edges.
This is also confusing, and that diagram was fun, so let's try that again. It's upside down, because that's how you'll crochet it.
 * * 
*XX*
*XX*
*XX*
*XX*
*XXXX*
*XXXX*
-  -  -  -  -
* * * *
X= single stitch
- = original chain
*= slip stitch around, added last   


I attached the "T" to the front using a yarn needle.
Also I sewed on some fab buttons.

Lastly, I chained a really long (3 foot?) chain, and then sewed it on as a cursive reminder. 

I think that's my favourite part.

Saturday, February 25, 2012

Week 9: Spring Necklace


One of my lovely girlfriends, who reminds me of all things coral, spring, and sunshine, is having a birthday soon.  I figured she could use something bright and fun to remind her of what she is to me. 
 
  The beads I chose for her necklace are sunny beach colours that remind me of her.  Secondly, because she's a preschool teacher I chose bead shapes that would enchant her children.  I know from experience that her young children will be fascinated by the "treasure," or "candy," around her neck.  Thirdly, I hunted down beads with relatively large holes because I love organza ribbons in necklaces, and because I struggled my way through small holed beads on a necklace I made last year. Not going through that again.
 Materials: Scissors, 3 meters of 1 cm wide organza ribbon. mixture of beads (I used 40).  I also bought 3 meters of fishing-line just in-case the ribbon wouldn't fit (I didn't end up using it).
Not pictured: half meter of 2 cm wide organza ribbon, and a yarn needle. 
 I laid all the beads out in three rows of different lengths.  I'm too neurotic to make a non-symmetrical necklace, so I made sure to have one extra bead as the center of each row.  The tangerine coloured beads are slightly pointed at one end, so I also made sure they were all pointing towards center (or away) as to not mess with the symmetry.
 LOVE those beads that look like marbles.
 Between each bead I tied a knot in the ribbon, to keep the beads in place.
 When I finished a row, I tied a knot, and then a second knot a few inches down. Then I started the next row. 
 So all three rows were attached in one long string. 
 Then I zig-zagged the rows back and forth with the spaces between the rows all pressed together. 
 Here's where I made the mistake of thinking I didn't need to try anything on before finishing (like every other project I've ever made).  When I tied all the ends together it turned out that I had one short strand, and two long strands, with nothing in the middle.  Sigh.  Time to tear apart the last strand of the necklace and remove some beads to shorten it.  

Note: If you, unlike me, like to measure twice and cut once (you planners, you) maybe buy more ribbon than you need, and string each strand separately. Start with the center beads, and leave three inches of ribbon on each end so that you can adjust the lengths there instead of having to untie all of your knots.  Grr. 
 Anyway... once your strands are all the perfect length, tie a tight knot around the ends on one side with your thicker ribbon.  Stand in front of a mirror to decide how long the necklace should be.  Unless you're adding some sort of clasp, don't forget that it needs to be long enough to pull over your head.  Tie another tight knot around the other three ends.  

Cut the ends off leaving about half an inch. 

Ta-Daaa!  

Happy Birthday Nikki!  Your gift is coming just a little late. 

Sunday, February 19, 2012

Hop Hop! Bunny Beanie!


Download my Top Down Beanie Excel Spreadsheet to figure out how many stitched you should be using to make your beanie the right size. This post contains pictures and commentary, but the spreadsheet contains the actual pattern for the beanie.  Use both.

Materials: Yarn (I've used all weights), Crochet Hook (I use my trusty 5.00mm), Scissors, Yarn needle. 

Refer to beanie measurement chart.  Or measure your own head.

Average Head Sizes (in inches):
New born: 14"-15" around, 6"-7" tall
Baby: 15"-18" around, 7"-8" tall
Toddler: 19"-22" around, 8" tall
Kid: 21"-22" around, 8"-9" tall
Teen: 20"-22" inches around, 9"-10" tall
Adult woman: 21"-23" around, 11" tall
Adult man: 23"-24" around, 11"-12" tall


Use this online actual size ruler  if like me, you're too lazy comfortable to get off the couch and find a real-life ruler.
Stretch the yarn slightly while you measure, so the beanie fits snugly.
I wanted to make a toddler beanie, so I chained to 20 inches.

Then I counted the chains:  52.  The pattern I wrote works in multiples of 7, so I rounded up to 56, and plugged 56 into the space next to "Cir. of Head."

I pulled out the chain, and started work on my magic circle.
If you don't know about the magic circle, learn about it here.
Tighten circle, and Sl st to close.
During each of the next 6 increasing rows, I use Sl sts to end each row, and a climbing chain (2) as each first HDC.  I didn't specify this in the pattern, as it isn't necessary, it simply helps me to keep track of where I am in my rows.
Can you see the first stitch in the round?  I can! 

Climbing Chain!
Once I reach row 7, and am no longer increasing, I stop Sl stitching to the end of the row.  Instead, I just HDC in each stitch all the way around.  Ending a row with a Sl st and a climbing chain leaves little visible holes.  HDCing all the way around looks more continuous.
Row 7 finished!  No more counting! YESSS!
Again, I use the online ruler measure the height of my beanie.  Once I reach 8 inches I fasten off.  
LOVE not having to get off the couch to find a ruler. 

Now for the ear flaps...

Again... refer to the Excel Spread sheet to know how many stitches wide your ear flaps should be.  I couldn't figure out how to make the program round to the nearest whole number, so you'll have to do that on your own. (Does anyone know if there's a function for that?)

The space between the ear flaps in the front should be wider than the space in the back.  You don't want those ear flaps in your face.  

Back<---------   ---------->Front
When you're done making the ear flaps, single stitch all the way around to even out the bumpy edges.  I used white just for fun, but also so you could see it better. 
See those rough edges?

The vertical edges around the ear flaps are somewhat tricky to stitch into, simply because they go from side-of-climbing-chain, to side-of-HDC. Simply try to keep them evenly spaced.  
Aim for one stitch in the climbing chain, and one in the HDC.  Repeat.

Also, while you're going around the corners, add an extra stitch in the corner stitches on the bottom edges of the ear flaps. 

An extra stitch in the corners will help keep the corners flat.
But on the upper corners where the ear flap meets the beanie chain two spaces together. 
Decreasing around these corners will keep the corners from flaring.

You have just completed the basic beanie that I use for most of my animal beanies!  Stay tuned if you want to turn it into a bunny...

 
Inner Ear (make 2)

Chain 7.  HDC in 2nd chain from the hook.  HDC to the end of the row. 
Row 2-5: Chain 2.  HDC across.
Row 6:  Chain 2.  HDC in first stitch. HCD 2tog. HDC to the end of the row.
Row 7: Chain 2. HDC across.
Row 8: Chain 2.  HDC in first stitch. HCD 2tog. HDC to the end of the row.
Row 9: Chain 2.  HDC across.  
Row 10: Chain 2.  HDC in first stitch. HCD 2tog. HDC to the end of the row.
Row 11:  Chain 2.  HDC 2tog. 
Slip stitch all the way around.  

Outer Ear (make 2):

Chain 10. HDC in 2nd chain from the hook. HDC to the end of the row.
Row 2-5: Chain 2.  HDC across.
Row 6: Chain 2.  HDC in first stitch. HCD 2tog. HDC to the end of the row.
Row 7: Chain 2. HDC across.
Row 8: Chain 2.  HDC in first stitch. HCD 2tog. HDC to the end of the row.
Row 9: Chain 2.  HDC across.  
Row 10: Chain 2.  HDC in first stitch. HCD 2tog. HDC to the end of the row.
Row 11: Chain 2.  HDC across.
Row 12: Chain 2.  HDC in first stitch. HCD 2tog. HDC to the end of the row.
Row 13: Chain 2. HDC across.
Row 14: Chain 2. HCD 2tog. HDC 2tog.
Row 15: Chain 2.  HDC 2tog.  
Single Stitch all the way around. Leave a 18" of a tail, for sewing.


Clip inner ear to outer ear.

 
Sew on using long tail of outer yarn.


 Pinch the bottom of the ear closed and sew onto beanie just outside the first round.  I sewed mine on a little towards the front, and pointing out a little.

Nose (make one):

Chain 7.  Single stitch into 2nd chain from hook.  Single stitch across.
Chain 1.  Single Stitch 2tog.  Single stitch into next stitch.  Single stitch 2tog.
Chain 1. Single stitch 2 tog twice.
Chain 1. Single Stitch two together.
Single stitch all around to edge.
Leave 6" of tail for sewing on.  


Outer Eye (make 2)

 Start with a magic circle. 
 HDC into circle 8 times.
HDC 2 in each stitch all around. 
*HDC 2 in first stitch, and one in 2nd* all the way around.
Sl stitch to fasten.  
Leave 12" of tail for sewing on. 

 Inner Eye (make 2)

Start with a magic circle.  
HDC into circle 10 times.
Sl st to fasten.  
Leave 6" of tail to sew on.


 Clip eyes and nose in place and sew on using yarn needle and tails. 


 That's one cute bunny!

Feel free to use this pattern for your own crafting joys.  Let me know if you have any problems or questions.  If you post pictures of your bunny beanies on your blog, please refer your readers back to me.

Hoppy crafting! (sorry)


Sunday, February 5, 2012

Week 5: Produce Bags


Last fall, while looking for something to do with my left over yarn pile, I stumbled upon this pattern for eco-friendly produce totes on a blog called Oh The Cuteness!.  I've since started following her regularly, because she is just too darling. 

After trying out my first bag, and finding some kinks I wanted to work out, I made 2 or 3 more before finding a pattern that really worked for me.  

Kinks
  1. The holes in the netting were so big that smaller fruits (plums and apricots) fell right through. 
  2. The bags were SO expandable that they could fit WAY more fruit than I would ever buy for a family of two.
  3. The lack-o-drawstring:  I really wanted something that would hold the produce in.
  4. The handles.  Once I had added a drawstring, the handles were just in the way.
Solutions:
  1. Shorter connecting chains.
  2. Smaller circle to start off with. (Bonus:  this added to Solution 1 means faster bag making).
  3. ...Add... drawstring... (bet you didn't see that coming).
  4. Use draw string as handle. 
Now that I had a pattern that worked for me, I made a whole set for myself, using up all the balls of yarn I had left over.  But it didn't stop there, because now I was addicted to this fast, easy, Eco-chic, project.  I made 17 more to send out as Christmas gifts to market going friends.
"Holy crap the bags are amazing!  We used them yesterday at farmer's and they are so useful/beautiful.  BTW, they hold WAY more than 6 apples."- Mateo
And now, more recently, I've started making some extras to hand out at the market.  Turkish people haven't gotten the concept of recycling yet.  They are plastic bag loving people.  Before I started making these totes, I was reusing plastic bags for as long as I could.  I would show up at the market with my canvas tote filled with plastic bags, and fish one out to fill up with apples, or tomatoes, or oranges.  Without fail, the market seller would offer me a fresh bag, look confused, re-offer, and sometimes even dump the bag I filled into a new bag and throw out the old one.  "This crazy lady doesn't realize they're free!" I'd try and explain in my broken Turkish, that "Plastic sevmiyorum. Dunya seviyorum!" or "I don't love plastic, I love the Earth," and they'd shake their heads to signify that they didn't understand either my Turkish, or my crazy ways.  

Danielle uses them for apples and donuts. yum.
Now that I have my produce totes I'm funnier than ever.  They still always offer me a plastic bag, and then if this is their first time meeting my bags, they examine them closely, before shouting to their friends in delight:"Bakarmısan! Yeni modal poşet!" "Look! New model!" Then "Bu yaptınız mı?" "Did you make this?"

I've made enough non-tote-using, green-is-just-a-colour-not-a-way-of-life people chuckle at my bags, that I've started asking "Bu istiyormısınız?" "Do you want it?"  They always smile politely and say no, but truth be told, I'd be so happy to spread a little Eco-love around here.

So the other week when we were buying oranges, lemons, and tangerines from a citrus seller, and his wife got all squeaky and said "Bu istiyorum!"  "I want this!"  I jumped on the opportunity.  I asked her what colour she wanted, and promised to return with a bag for her.  

I made hers extra big, with 20 stitches in my magic circle instead of 16, and 16 rows instead of 14.  Turkish people tend to buy way more of everything than we do, probably because they are feeding a much larger extended family, possibly because they own a restaurant. I figured my totes that carry 8 or so apples wouldn't be big enough to be practical for her.   I tested it out after finishing it, and sure enough, I could fit 20 oranges and grapefruits into that big Mama.  I'll give it to her tomorrow, and add some pictures of her with her new bag tomorrow night. 

Difficulty: EASY!

Usability: %100! Wash on cold, hang dry, use a million times!

Materials:
Any type of yarn you want to get rid of. About 1/3 of a ball in total.  Hook: 5.00 mm. 

Stitches used:
HDC:  Half Double Chain 
Ch: Chain
Sl St: Slip Stitch

Here's the pattern!

PS: I've been linking to Scribd as a way to publish these patterns.  Let me know if they aren't working for you.  

Happy crafting!

Tuesday, January 31, 2012

Week 4: Lovely Valentines Day Bunting


My mom came for a visit!  One of my favorite things about having guests is decorating their rooms to make them feel welcome.  (OK OK it is my secret goal that they will at some point during their stay refer to me as an even-better-than-Martha hostess.)

Because the room was set up with Christmas decorations from our last visitors, and because my mom would be here for the very start of February, I decided to go with some hearts.

I found this darling, and oh-so-easy crochet heart bunting pattern from Simple Beans.

And added some white every-day bunting that I came up with.  
I discovered this super easy and fun to make Itty-bitty-bunting while trying to make monster teeth.  After I got done squealing over it's cuteness, I spent a week or so thinking of something I might use it for.  Thank goodness my mom decided to come for a visit!

Here's the pattern:

Happy Crafting!