Showing posts with label Sewing. Show all posts

Tuesday, December 25, 2012

Tuxedo Pillow Cover

One of my friends REALLY loves buying new throw pillows.  Unfortunately for her, her husband is not as huge of a fan of them.  We've discussed doing a throw pillow exchange, but really, I don't have any to trade with her. So I figured I could add a few to her collection in the form of pillow covers.  

I bought some silky iridescent fabric that reminded me of the ocean. I figured it would be a good match to their beachy Morro Bay home.  

I started by cutting 4 strips of fabric (1 yard x 4 inches). 

Then I folded then each in half length ways, and sewed a seam down the side.  After sewing each strip, I flipped them all inside out. 

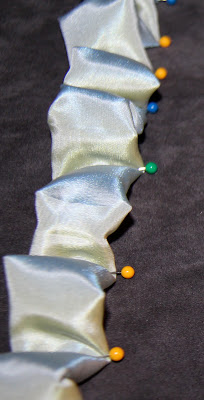
Then I gathered each strip and used a million pins to attach them some gray suede.

Four rows, evenly spaced.

After sewing each of the ruffles down, I pinned one side of a zipper to the top of the square of fabric.

I sewed one side of the zipper to the front of the pillow, and the other side to the back.

After the zipper was attached, I flipped the front and back inside out, and pinned them tightly around the pillow.

I forgot to leave the zipper open a few inches, which made it very difficult to pull the pillow out.  Don't make that mistake.

After sewing around the sides, and flipping it right side out I had a slightly loose pillow case.  We'll see how it fits her pillows before I try tightening it up.

 I started making a coordinating pillow case to go with it...
Unfortunately it's on time out for being really unattractive. 
Disclaimer:  I have different rules for children and pillow cases. 

Happy Holidays D!

Thursday, December 20, 2012

Week 51: Days of the Week Towels

 Today's Christmas present it for two dear friends with a kitchen towel obsession. Remember that episode from Friends where Monica and Rachel are competing against Chandler and Joey for the apartment, and they have to answer trivia questions about each other to win?

Ross: Monica categorizes her towels.  How many categories are there?
Joey: Every day use.
Chandler: Fancy
Joey: Guest
Chandler: Fancy Guest
Ross: 2 seconds.
Joey: Uhh... 11?
Ross: 11, unbelievable! 11 is correct.

Well these friends love towels as much a Monica.  And they love Friends.  Boom. Friends reference in blog post= double Christmas present!  Your welcome.  

 So I made them a set of dish towels that will take them all the way through the week.
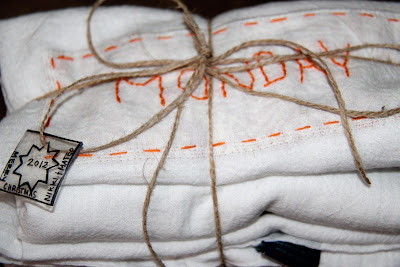
I bought the tea towels at Target, embroidered the fronts, and Alan added a fabric patch to the back to hide all the scrappy threads.

Monday is embroidered in orange using a back stitch, and backed in left over Fancy Napkin Fabric.

Tuesday is embroidered in green using a ladder stitch, and backed in fabric from a men's dress shirt I picked up at a thrift store. 

Wednesday is a gray running stitch, backed in fabric from the piano bench we picked up at a garage sale. 

Thursday is a turquoise back stitch, backed with apron fabric. 

 For Friday, I finally learned how to french knot!  The yellow knots are bordered by a peach back stitch, and it's backed with fabric form a vintage sheet set.

Saturday is a back stitch with french knots at the ends of each letter, and is backed with apron fabric. 

And Sunday is a pink chain stitch backed with more apron fabric

So pretty together...

And the first package under our tree!

Merry Christmas Nikki and Mateo!

Thursday, December 13, 2012

Hexagon Quilt Finale

Finished!  Finito! Bitti! Done! phew.


 "What did you finish?"  You might be thinking... 
Just kidding.  With the amount of posts this quilt has earned, there is NO WAY you're thinking that. 
But just as a refresher...

The quilt where I had to use a homemade protractor, and lots of math equations to cut hexagons and triangles that would actually fit together the way I imagined...

 The one with the stripe of triangles across the back...The one I hand quilted...

 Well I bound up the edges.  I really wanted to hand bind it, like my amazingly talented grandmother.  When I look at the binding on her quilts, I can hardly see a stitch.  Even when I really examine.  I want to be that good some day.  Unfortunately today is not that day.  I sat down with every intention of hand binding, and it was a disaster.  I'm just not as patient and talented as she was.  Yet. So I got out the sewing machine.  And the zigzag stitch method worked, it just isn't nearly as pleasing to me.

As I was photographing I had to laugh at the layers of quilts on our bed.  From top to bottom: My grandma's wedding ring quilt, Alan's T-shirt quilt, Diana's log cabin quilt, and new baby's hexagon quilt. So much love. 

All tied up and ready to go. 

My little bundle of joy for theirs. 
We can't wait to meet you, little one!

Tuesday, December 11, 2012

Week 49: The Tiniest Little Purse

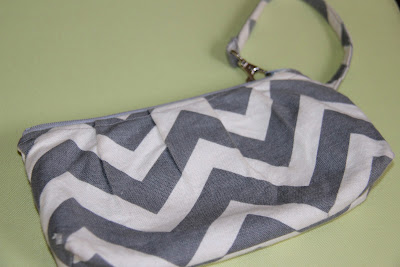
As a bridesmaid gift this year, I got my new favorite purse.  It's just the cutest thing with its chevron print, its little side handle, and its teeny tiny size.  It looks way too small to be practical, but it's totally big enough for keys, cards, money, a phone, lip balm, hand sanitizer, and any other small necessity. And I constantly get compliments on it. 
 This tiny gem was an Etsy purchase.  Check out Maddie Kay if you want one of your own.  I figured I'd try making some this year.  Or at least one.
 I knew I needed a strong and durable fabric for the outside, so I went with the stripey one (it's called ticking, no idea what it's for).  And I was obsessively drawn to the floral one for the lining, because I wanted something that would pop, but also because it reminded me so much of the heirloom wedding-ring quilt on my bed. I checked my quilt when I got home, but alas, my grandmother didn't really use this fabric.  Oh well. That wasn't the point anyway. Also, I picked up a 7 inch zipper in a matching color.
My first step was to trace around the bag.  My paper wasn't big enough, so I folded the bag in half and lined the fold line up with the edge of the paper.  I needed to make allowance for the pleating at the top of the bag, so I extended the top by and inch on each side.  
(The bag measures approximately 8 inches across the bottom, and comes in slightly at the top.  I ended up cutting a shape that was somewhat like a round edged trapezoid with the height of 6 inches, a base of 9 and a top of 11.   This accounts for an inch around of seam allowance, and two inches at the top for pleats.)

Folding the fabric in half and laying the fold on the edge of the paper, I cut out the bag's front and back. For me it was important to have the lines laying horizontal. If you are using fabric with a direction, be sure to account for that before you cut. 

Now.  The pleats.  My absolute favorite part of this darling little bag.  Aren't they lovely?

To make my own, I used my iron and some straight pins. first I used a pin to mark the center.  Then I folded under about a half inch away from the center on each side.  And another inch or so on either side of that.  All folds face out.  I ironed really well to make sewing easier.  (Do this to both the front and the back.)

Don't the pleats look perfect similar?

I sewed a seam right across the top to keep the pleats in place, and them I folded over a quarter inch, and hemmed.

Next I sewed front to back with right sides facing, leaving the top of the bag open. 
Set that part aside for a little while, it's time for the interior. 

So I unfolded the fabric to cut, and solved the quilt mystery. 1930's replica.  No wonder it reminded me of my grandma. 
 I wasn't going to pleat the lining, but I wanted it do be the same size as the outside, so I traced the completed shape of the outside to get the correct shape for the inside. Cut 2.  Next I measured a credit card, added an inch in length and height and cut 2 for the pockets.  Because my fabric has a clear right side and wrong side I knew the pocket had to be double sided, but if you're using something that is reversible, just cut one pocket.

For the lining, I hemmed the top of each bag side 1/4 inch. Then I did the same for all the pocket sides before sandwiching them together (wrong sides facing) and sewing all the way around. I centered the pocket on one side of the lining and sewed around the sides and bottom.  Then I sewed the two sides of lining together wrong sides facing, leaving an opening at the top.

I nestled the lining inside the outside (flip the outside, but not the inside). and lined up all the edges, pinning the zipper inside.  Before I sewed closed, I added the strap (sorry about the lack of pictures, look at the finished product).  I used about a foot of fabric, 3 inches wide to make the strap.  Use the iron to fold edges under, then fold in half and sew seam along the edge.  Tuck an inch of each end into the corner of the purse (between lining and exterior) and sew down with multiple passes of a zigzag stitch.

Zippers are my arch nemesis.  I'd like to say I finally overcame my inability to use zippers, but if you look closely, you can see that the learning process still isn't over. 

All in all though, this little bag is a HUGE step up from the purses I made all of my girlfriends when I was 20.  I wish I had pictures, they were so bad. Sorry Tiffany, Nicole, Brittney, and Shannon.  You guys got the ugly ones. 
Merry Christmas Secret-Purse-Loving-Friend!