Showing posts with label Embroidery. Show all posts

Monday, December 24, 2012

Continuing the Cross Stitch Tradition

I spent a day this summer helping my mom hang up pictures and other treasure in her new home.  On a wall next to a cozy chair, we hung up a collection of cross stitch art that my grandmother had made for my mother.  Some of the pieces were made by my mom too.  So this Christmas I decided to learn to cross stitch, and add a third generation to my mom's wall. 

I started with some cross stitch fabric, some mini hoops, and my stash of embroidery floss. 
As with most other crafts, I didn't bother to actually learn how to do it, but just figured I could wing it with a bunch of x's. Can't be that difficult right?  I started by drawing the outline of some birds on the fabric.  Right away all of my coworkers told me I was doing it wrong.  I just kept going though. 

I made a pelican...

And an owl.  

But I didn't know what to do with this super messy back.  So I looked it up.

I found a tutorial on Maximum Rabbit Designs. I hadn't left enough extra fabric around the pelican one, so I was able to do the owl one according to her instructions, but I had to do the pelican one slightly differently.  

I cut two circles of tag board (one the size of the inner ring, and one the size of the outer ring). I cut some circles of batting just a bit bigger than the tag board, and some fabric just bigger than the batting.

Then I used embroidery floss to pull the fabric tight around the batting and tag board.

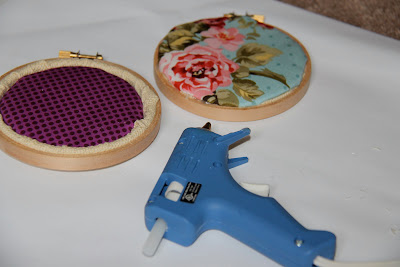
Two fabric covered circles ready to hide the ugly backs of my work. 

I tucked the front fabric down around the inner hoop, and hot glued the covered disks over the mess. On the owl I was able to follow her directions (plus hot glue) and fit the disk inside, but on the pelican I folded the fabric in as well as I could and glued it to the hoop.  I actually liked that way better, and will probably do it that way if I ever do it again.

That said, this may be the last time I ever cross stitch.  This was the most TEDIOUS craft I have ever done. What looks like it should have taken 10 minutes took a months worth of lunch breaks and cramped fingers.  All worth it for my favorite lady.
Merry Christmas Mom!

Thursday, December 20, 2012

Week 51: Days of the Week Towels

 Today's Christmas present it for two dear friends with a kitchen towel obsession. Remember that episode from Friends where Monica and Rachel are competing against Chandler and Joey for the apartment, and they have to answer trivia questions about each other to win?

Ross: Monica categorizes her towels.  How many categories are there?
Joey: Every day use.
Chandler: Fancy
Joey: Guest
Chandler: Fancy Guest
Ross: 2 seconds.
Joey: Uhh... 11?
Ross: 11, unbelievable! 11 is correct.

Well these friends love towels as much a Monica.  And they love Friends.  Boom. Friends reference in blog post= double Christmas present!  Your welcome.  

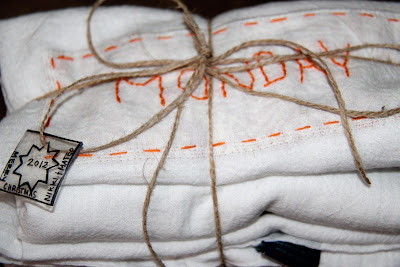
 So I made them a set of dish towels that will take them all the way through the week.
I bought the tea towels at Target, embroidered the fronts, and Alan added a fabric patch to the back to hide all the scrappy threads.

Monday is embroidered in orange using a back stitch, and backed in left over Fancy Napkin Fabric.

Tuesday is embroidered in green using a ladder stitch, and backed in fabric from a men's dress shirt I picked up at a thrift store. 

Wednesday is a gray running stitch, backed in fabric from the piano bench we picked up at a garage sale. 

Thursday is a turquoise back stitch, backed with apron fabric. 

 For Friday, I finally learned how to french knot!  The yellow knots are bordered by a peach back stitch, and it's backed with fabric form a vintage sheet set.

Saturday is a back stitch with french knots at the ends of each letter, and is backed with apron fabric. 

And Sunday is a pink chain stitch backed with more apron fabric

So pretty together...

And the first package under our tree!

Merry Christmas Nikki and Mateo!

Wednesday, August 22, 2012

Week 33: Embroidered Totes

 More wedding crafting!!!  My best friend since kindergarten, Tawnee, is getting married in September. She asked me to help make welcome bags that would double as favors for the guests.  Mainly my job was to fill the bags with things that the guests might need during the ceremony and reception: water bottles, gum, tissues, sunscreen...  Also though she wanted to use canvas totes that the guests could keep and use forever as a token from the wedding.  She suggested that I paint or stamp them all with their initials.  That would have been adorable, and easy.

I suggested that I embroider patches for them.  Even more adorable.  But NOT easy.  Idiot.  

But now they're finished, and I love them.

I embroidered all of the patches onto a large piece of teal fabric and cut them out once I was finished. DON'T cut the patches out first.  They wont fit in your hoop if you do. 

 Supplies:  Fabric.  I used a little less than a yard, but I made 52 bags... so you probably don't need that much. 
Embroidery floss, hoop, and needle
 Spray-on adhesive (or pins)

Hand embroidering the same thing 50 times is tedious, so I used a lot of different stitches...
Running stitch for ease and speed...

Split stitch for a cleaner look...

Back stitch because it's just so cute...

Chain stitch because I think it's lovely...

And the Ladder stitch. Kind of. Let's say I made this one up.     

After embroidering the initials, I cut them all out, adhered them to the totes with the spray, and machine sewed them on with a zig-zag stitch.  They would probably look so much more adorable hand stitched on, but after 52 of these, I wasn't going there. 

We ordered all the totes from CheapTotes for 88 cents a piece. 

Stitch links come from the Stitch Embroidery Guide, though most of my stitches are somewhat made up, and look super sloppy compared to the actual stitches.

More to come as I fill the bags with goodies...

Monday, August 20, 2012

Week 32: Subtle Transportation

Another friend joins the mommy club this September.  Yeah for April and Reiner!  When I asked about a color scheme for baby Jaxson, she said that they weren't doing a color scheme as much as they were doing a subtle transportation theme. 

To go with the theme, I made a set of subtle transportation onsies. 
Can you tell what they are yet?

 I scooped up a 5-pack of onsies at Joann for $10.99 (score!), and the rest of the supplies were already in my possession...
Spray adhesive
Embroidery hoop, floss, and needle
fabric scraps

I free hand draw some pretty adorable animals, but for some reason, I have no ability to draw vehicles.  So I spent some time on google images looking up line drawings of boats, planes, trains...

This one was easy enough to just look at and free cut some shapes.  A running stitch holds them all on, and makes the waves. 

 The hot air balloon was slightly more challenging. I sewed all the pieces together using a sewing machine, and I'll tell you, sewing on those curvy lines isn't something I'll do again. 

But I absolutely ADORE how quilt-y it turned out.  (This one is my fave.)

The words on each of these was done using rubber stamps, and a textile medium mixed with an acrylic paint. Don't dip the stamps, but use a brush to apply the paint, so it doesn't get too gloppy. 
Once the paint is completely dry set it with a hot iron.

I also spread the paint onto the tire tread of a toy car.  Vroom. Vroom. 

I added some tiny matching cars onto the tire tracks.

Lastly, to my mom and Alan's delight, I made a mo-ped.  

I did this using freezer paper (you could buy it at the grocery store, or you could just go to the butcher and see if he'd give you some for free. Mine did!).
 I traced the outline of the scooter onto the paper, and then cut it out.  Then I used a hot iron to adhere the outside frame of the mo-ped to the fabric, and then painted in the center.  The freezer paper creates a tight seal so that the paint doesn't spread. I let it dry completely, and then pulled the paper off. 

I outlined the scooter with a back stitch.  

Congratulations April!  Can't wait to hold your little guy!

Sunday, April 8, 2012

Week 14: Put Some Birds On It

First of all: Happy Easter everyone!  I hope it's lovely. Secondly: Alan's parents are coming in two weeks, and we're SO excited!  I love having visitors, and because it's a rarity now that we live in Turkey it's even more special.  

I try my best to Martha-it-up in the guest bedroom whenever we have visitors.  Our last visitor was my mother who came in February, and I had decorated the room with this lovely heart bunting.  But seeing as we are well into spring, I decided it was time for something different.  And after squealing over baby chicks and ducklings at all the markets these days, I figured some birds were in order.  

I used more scrap fabric, embroidery floss, and some stuffing.  
If you're like me, and currently living in a foreign country with no craft stores, it might be challenging to find stuffing.  If that's the case, you can use the real scrap left overs that you wouldn't usually bother saving because they are so small, or you could use shredded paper, or cotton balls... or you could do like I did, and cut into a cheap balcony pillow that you never remember to use anyway.  I've stuffed a ton of things with batting from this pillow.  There's still so much left that I just put the cover back on, and you can't even tell.  This method also works well if you're cheap.  I'm not judging AT ALL.  In fact, I highly recommend being frugal and green whenever possible. "Cheap" and "Earth-friendly" are the new "Rich" and "Modern."  In my book at least.

Anyway... Back to the birds.

I cut some shapes out of paper, and then traced the birds onto fabric folded in half.  

Two of each. 

Then I sewed them together!  (My sewing machine is waiting for me in California, so I had to do this all by hand.  Not recommended, but they did come out looking kind-of-purposefully-scrappy.)

With my first bird, I started with the right sides together, and sewed most of the way around, and then flipped it right-side out. I was less than impressed.  My hand sewing was less than stellar, and it didn't even look like I had tried to hide the stitches by sewing inside out.  
Bird 1
So on the second bird I didn't even bother. I just whip stitched all the way and didn't bother to flip it. 

When I had about an inch left to sew, I filled it with the stuffing. 

And closed it up. 

I used the same thread to make some eyes.

And to stitch on some wings.  

Quick tip 1:  To get the eyes and wings even on both sides, look from the front of the bird, and from the top while you have the needle poking through. looking just from the sides will probably result in some lop-sided-ness. 


Quick tip 2:  To hid all the knots, don't bother tying off, and cutting until you've FINISHED the bird. When you finish the seam (I try to start and finish in the neck area) just send the needle back in, and out again in the eye spot.  Go back and forth from one side to the next, making both eyes at once.  Then dive back in, and come out where you want to tack the wing down.  Again, do both wings at the same time, going from one side to the next.  When you finish, tie off, but don't cut.  One more time, send the needle all the way through the bird.  Pull it tight, and cut close.  When you let go, the end of the thread will bury itself in the middle of the bird, never to be seen again. Ta-Da!

Back in through the neck seam, and out through the wing. 


 I like this little flock of birds and ducks. 
Pete
Penelope
 
 Defne
 And Wilbur

Now to find them a home!