Sunday, March 25, 2012

Week 12: Baby Clothes are Just the Sweetest!


I've said it before, and I'll say it again:  crafting for babies makes me want one.  REAL BAD.  (Don't tell my husband.)  I mean their teeny-tiny little clothes, and their ability to pull off any sort of hilarious animal hat... Sigh.

But as hard as it is for me to not get to have one of my own, I'm so glad to have so many friends expecting little ones.  I'll just kiss all over their faces.  And blow raspberries into their necks.  And tickle their little toes.  And marvel (and possibly weep) over their tiny noses. Until I can have one of my own.  This might be a long couple of years...

Week 11 brings us ever so close to the birth of our neighbors' son Ege.  Summer is fast approaching in Alanya, so no beanies.  And Hacar (the baby's mama) is a master crocheter, so I wont bother making this little boy a blanket, because Mom is sure to have made many.  
So baby clothes it is. 

I made some extra as gifts for my little friend Demir.  Demir's mom and grandmother made my wedding dress, so you know... we're family.  

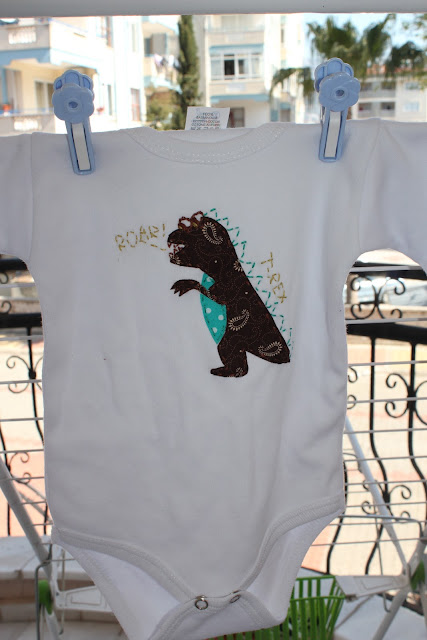
I used fabric scrap left overs, iron adhesives, and embroidery to attach and add detail. 

I sketched out a few of my favourite things: a whale, a t-rex, ice cream (OK I don't love it, but it's Alan's fave), and a robot family (again, not really my thing, but I've been feeling inspired by them lately). If you're not a sketcher, just google silhouettes for whatever animals or shapes you want to use.

I cut the shapes out of the iron on adhesive, and after ironing, cut them out of the fabric.  
Peel the paper backing off...
Iron... iron.. iron...

And stitch... stitch... stitch... 
He looks creepy without his eyes...


Lots of small details are fun to add with stitching rather than fabric...

Teeth, spikes, words... (the eyes were not fun)

More words... (tatlım means sweetie)

Waves and whale spouts...
 
Or even the whole design!

 I love this Dad.  And his mouth. 

Mom looks a little frazzled, but who can blame her?

 Sweet ice cream and a fierce dino for Demir...

 And a 'bot family and a fat little whale for Ege...
 I have never been more in love with my laundry rack...
 Sigh...


Monday, March 19, 2012

Week 11: Ribbon Ruffle Necklace

I had so much fun making Nikki's necklace in Week 9, that I decided to make another birthday necklace this week. This necklace will be made for my absolutely lovely step-mom, Susan. 

I've been feeling inspired by necklaces like this one by Stella and Dot.

I like how the ribbon wraps around the beads rather than going through them. 

Also I thought this might be easier on the ribbon, and my sanity, what with not having to tug all the ribbon through those tiny holes. 

It means needing more ribbon, and fishing line... but I planned ahead and had those on hand.  Horray for planning ahead!

I had LOTS OF BEADS due to "Hundreds Day" at school a few weeks ago.  There were rumors that we would all have to come to school dressed with 100 of something on our clothing.  The kindergarten teachers all get really silly and attach 100 ping-pong balls to their t-shirts, or 100 Turkish flags... But I work in the upper grades too, where all the teachers dress like fashion models.  So I had planned on making myself this jewelry.  Fortunately for my stress level that week, the rumors were false, and I got to go to bed at a normal time that night.  Lucky Susan.  
I started by sorting out all the beads.  

I decided to use the little ones to make a bracelet. So I put those aside, along with a few of the clear ones. 

Then I laid them all out in three rows, making sure each row had a different amount of beads, and that each row length was different by at least an inch or so.  

 I measured a piece of fishing line a about five inches longer than the first row of beads.  Then I strung it through a needle, and pulled it through the center of the ribbon about three inches from the end.

 I pulled the fishing line, until the end of it was even with the end if the ribbon, then wrapped them both around each other to make a knot right where the fishing line went through the ribbon.

I strung the first of my beads onto the fishing line, using the needle. At this point the ribbon is just laying to the side.

Then I wrapped the ribbon around the needle, keeping the bead as close to the knot as possible, and strung the fishing line through the ribbon right at the top of the needle.
Then I folded the ribbon back, making an 's' and poked the needle through two more times.
 Drop your next bead onto the needle, and push all the way down, smooshing your ribbon 's' between the two beads.
 
Because the needle goes through the ribbon 3 times total, now the ribbon will be facing the opposite direction, and will wrap around the next bead on the opposite side. If you want your ribbon to be on the same side of all the beads, string your needle through the ribbon an even amount of times between each bead.

Continue wrapping the ribbon, and adding beads until the final bead of the row.  Tie a knot at the end, keeping it close to the final bead. Leave about 3 inches of ribbon and fishing line after the knots at each end of the row.

Make all three rows the same way.

Test how the rows hang together.  Tie a knot at each end, holding all three rows together.

Use another length of ribbon to go around your neck.  Test it out in front of a mirror before tying. Leave enough room to slide it over your head! Tie a knot at each end.
Cut extra ribbon and fishing line leaving about a quarter of an inch.

I tied little bows around the ends to hide them!

For the bracelet, I wanted three separate rows of different beads.  I wrapped a piece of ribbon around my wrist, and laid that length our on the table.  I placed one large pink bead on the ribbon, and then laid enough small brown beads on it to cover the length of the ribbon.


I did the same with the other two types of beads.

I used elastic for this so it could stretch over my wrist easily.

 I started with a brown bead,wrapping the elastic through twice, leaving a two inch tail.  This keeps the beads from slipping off, without needing a knot. Then I strung the rest of the brown beads.

When I was finished with the brown beads, I slipped the large pink bead on.

Next I strung all the clear beads.  After the last clear bead I strung it back through the large pink bead.  
And again, after all the small pink beads, I strung the elastic through the large pink bead. Then I tied the end to the very beginning of the beading project (at the other end of the brown beads).  I tied three tight knots (for good measure), and cut the ends close to the knot.

Sorry about not having any pictures of the bracelet process.  

Happy Birthday Susan!  Thank you for inspiring my love of crochet, and for being such a loving and supportive second mother for all of these years.  Love you!!! 


Monday, March 12, 2012

Pinterest Challenge: Scrappy Flower Wreath

I have to confess:  I don't get Pinterest.  I know it's all the rage, and let's be real- inspiration boards full of crafty ideas is right up my ally.  But I'm not on board yet.  For one: I can't figure out how to get very much out of those pictures.  Maybe I'm doing it wrong, but clicking on one (even one that says "free pattern," or "tutorial") doesn't seem to get me anywhere useful.  I can't see the website or blog it came from, all I can see is the pinner's pinboard.  And I really don't need one more way to stalk everything someone else does.  That's what Facebook is for.   Secondly, I really don't need another thing that I become obsessive about, and waste my time with.  Again... I have Facebook for that. Thirdly, I tend to hate obnoxious, unnecessary emails, which seems to be all I get from Pinterest.

Someone. Please.  Fill me in, if I'm missing something.

BUT... I do blog.  And read blogs.  (And realize that blogging is just another way to stalk people I don't know, and waste my time on the computer.) But I love it.  I love reading people's stories, and seeing their crafts, and THE PROCESS OF THE CRAFT!  Unlike Pinterest, I can actually find out how someone did something creative, instead of taking a wild guess based on a picture.

Two of the (many) blogs I follow, are Delia Creates, and Young House Love (thanks D and B).  And today, those two blogs come together as inspiration for my blog. 

Young House Love is a blog written by a couple about home improvement jobs they do around the house. And this week they are hosting a challenge.  The Pinterest Challenge, is basically motivation to actually make something you've pinned, instead of just pinning away like crazy.  I don't pin, but for this I did.  Because if there is one thing I love, it's a challenge.

So I pinned this Spring Wreath that Delia made, and that I've been dreaming about. 

Isn't it lovely?  And made entirely from scrap fabrics and an old frame. 

I knew mine would be a little different.  I didn't have any extra frames, and I didn't want to buy one.   But I did have left over bamboo from this project... and later this one!

I figured I would make mine in more of a pentagon shape, just for fun.  

This turned out to be quite a challenge, because of weird angles, but I used some tape to hold it all in place while I was using twine to attach it.

Then I made flowers. 

 Lots of flowers.

I used two blue shirts that didn't fit Alan any more.  (I wanted more colours, but that guy pretty much only owns blue.)  
 
I also used scraps of fabric left over from Baby Evan's quilt.  

And I used these little blossoms from some lacy stuff I bought a long time ago, but never found a use for.

 Some flowers (like the ones above) are multiple circles (or other shapes) folded in quarters and then bunched together and sewed with a needle and thread. 

 These were made by fan folding a square of fabric, and tying around it with embroidery floss. 

 The blue blossoms were made with long strips of fabric, twisted around and around itself, and sewed together on the underside.  

 Some (above and below) are just stacked flowers.  Stack shapes smallest to largest, and sew on with a button.

This one is a larger square of fabric fan folded, wrapped around the bamboo, and tied with twine. 

I cheated, and didn't make this one.   It's from a headband that I never loved. Now it's on a wreath that I do love. 

After gluing all of the flowers onto the bamboo...

I attached a purple ribbon from my stash-o-scraps...

And tied it to the door! 

Welcome Spring!